Getting Started
Baffle Data Protection Services on AWS
Getting Started with Baffle Data Protection Services
Overview
This guide gets you started using Baffle Data Protection Services in AWS. It describes Baffle Manager and Baffle Shield system requirements and architecture, followed by a configuration walkthrough to set up Baffle’s column level encryption. The configuration steps are divided into five main tasks:
- Configure Baffle Manager — configure the Baffle administrative console
- Connect to your Keystore — configure the source for encryption keys
- Connect to your data store — configure a connection to a database
- Configure a Baffle Shield — configure the Baffle encryption engine
- Define a data protection policy for encryption — configure a data protection policy
Background Information
Baffle Data Protection Services provide a range of data encryption, tokenization and de- identification methods to protect data in data stores and cloud storage environments. Common methods that Baffle employs include column or field level encryption, tokenization, format preserving encryption (FPE), dynamic data masking, and record level encryption.
Baffle integrates with key management stores via a key virtualization layer. It also provides for a local key store so you can use your own keys for data protection in the cloud.
Pre-Requisites and Minimum System Requirements
Whether you use Baffle Professional Services to perform your deployment testing, or your organization does so independently as part of planning, ensure that your test environment meets the following minimum system requirements.
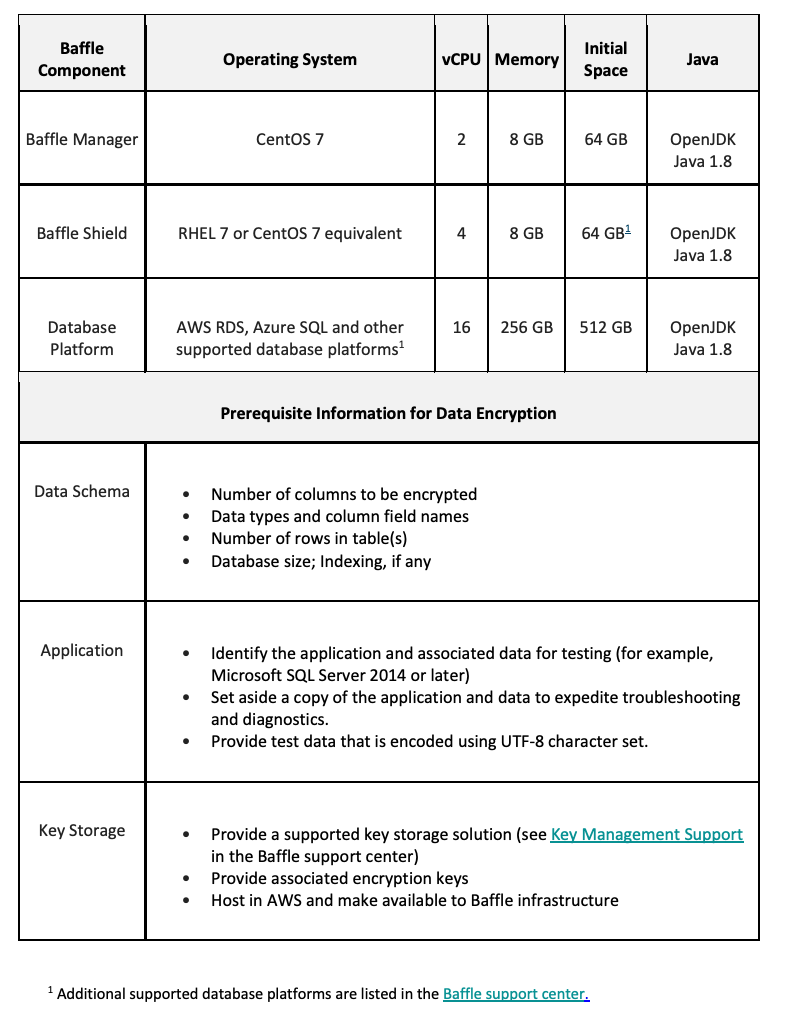
Baffle Architecture and Communication

Port Requirements
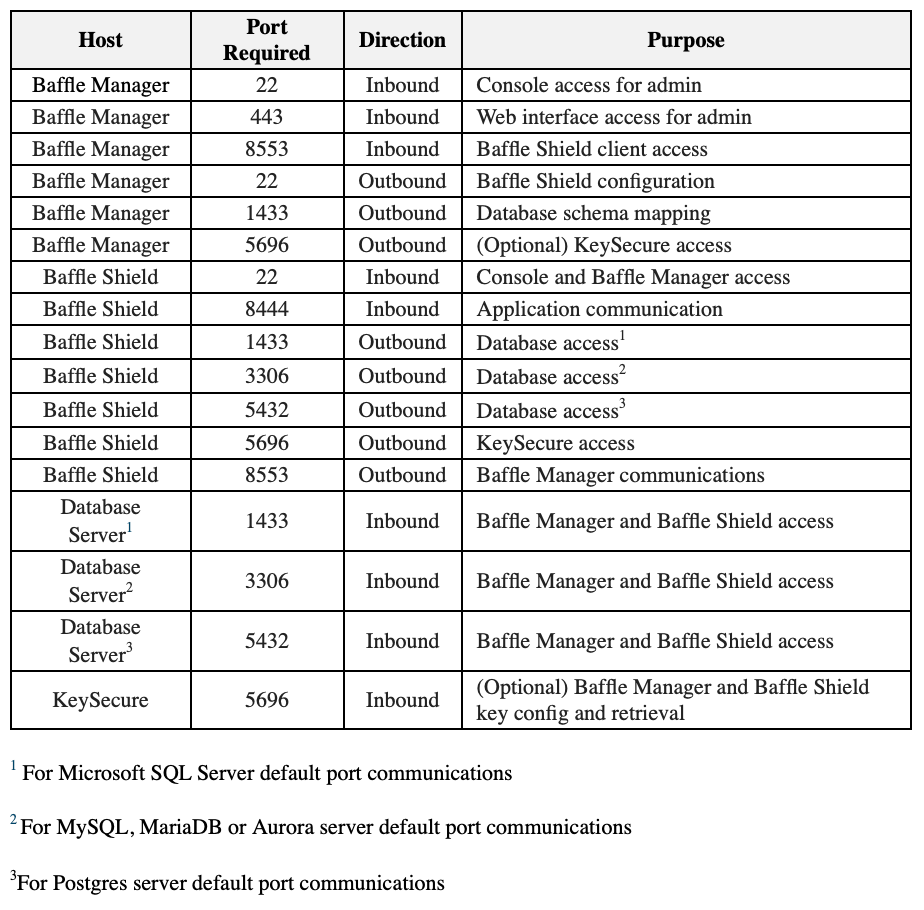
Baffle Manager enables encryption policies and configurations by communicating with the Baffle Shield and your databases. Baffle Manager constructs a privacy schema that maps key IDs to data columns, thus enabling encryption in a simplified manner.
The following table lists the ports that must allow connections in order for Baffle Manager to communicate.
Configuration Prerequisites
Before you begin configuring Baffle Manager and Baffle Shield, verify that you have met the following requirements:
- AWS account with admin privileges
- SSH client
- Private key pair
- Database privileges for encryption and migration, see Appendix A for details.
Task 1. Launch and configure the Baffle Manager AMI from AWS Marketplace
This task consists of two procedures. First, you will launch Baffle Manager and then configure Baffle Manager. NOTE: Baffle Manager AMI supports Docker containers.
To launch Baffle Manager, do the following:
-
- Search for Baffle in the AWS Marketplace or click the following link to begin setup – Baffle Data Protection Services, once on the page click Subscribe, then Continue with Configuration.
- Make the following selections to Configure this Software:
a. Delivery Method – 64-bit (x86) Amazon Machine Image (AMI)
b. Software Version – Baffle Manager Release (latest version is displayed by default) c. Region – Select the region. - Click Continue Launch, then under Choose Action select Launch through EC2 from the drop- down list and click Launch.
- Select the desired Instance Type from the list and click Next: Configure Instance Details.
- On the Configure Instance Details page, accept the default settings with the exception of specifying the following:
- Create a new security group on the VPC based on ‘seller settings’. This configuration opens the necessary ports for Baffle Manager. Set the range of IP addresses that will be permitted access.
- Ensure you have saved the selected key pair to access the Baffle Manager.
- Click Next: Add Storage, enter the desired root storage Size (GiB) and click Next: Add Tags.
- Click Add Tag and enter a Key and Value, then Add another tag with a Key and Value. Name and Owner are two commonly used tags.
- Click Next: Configure Security Group. On the Configure Security Group page, accept Assign a new security group, along with the Security group name that provides the recommended ports and connection settings Baffle Manager requires for its data protection services.
IMPORTANT! You must add your own inbound security group with your IP address here so you will be able to connect to BM in the web browser.
- Click Review and Launch to review the instance configurations. Verify that the PRIVATE_IP address for Baffle Manager is correct in the .env file (located in the BM-Docker-Deploy directory), then click Launch.
- You are prompted to Select an existing key pair or Create a new key pair. Once done, click the I acknowledge check box followed by Launch Instances.
- Click View Instances to go to the EC2 dashboard. Enter one of the specified tags to search for the instance.
To configure Baffle Manager, do the following:
- Once the instance is running, connect to it with a web browser via HTTPS. Use the public IP address of the instance, prefaced with https:// for example, https://192.168.1.1.NOTE: If you are unable to connect to the instance via HTTPS, check your security group inbound rules. Also ensure that your instance has finished initializing.
- Since the instance is bootstrapped with a self-signed certificate, you will receive an invalid CA warning. Select the browser option to “proceed”. You will have the opportunity to upload and use your organization’s certificate later in this section. The following window appears.
This dialog indicates that the Baffle Manager is in a locked state.
3. To unlock the Baffle Manager, access the system with SSH using “baffle” as the username for the SSH connection, followed by the public IP address (for example, baffle@192.168.1.1). You will also need the key pair file that you selected when you launched the instance. How you add the key pair depends on the shell client you are using (such as, SecureCRT).
4. You access the initpass file that unlocks Baffle Manager by connecting to the Baffle Manager instance with SSH, then using the following command to retrieve the unlock code.
sudo more /var/lib/docker/volumes/baffle_manager/_data/initpass
- In the Unlock Baffle Manager dialog, paste the unlock code in the password field and click CONTINUE.
- Configure System Settings. You are prompted for hostname and domain settings. All system users must have this domain name as part of this email going forward.
7. Configure Email Settings. This allows Baffle Manager to send emails to provide notifications and for password resets. Enter the SMTP server to use, as well as the login credentials for the SMTP server.
8. Create Admin Account. The screen below prompts you to create the initial Baffle Manager administrator account. This account is used to configure the subsequent components such as the key management store, data store connections, and Baffle Shields.

9. Configure Credential Keystore. This configuration screen establishes an encrypted credential store for any system access credential or access key that the Baffle Manager or Baffle Shield utilize. The default name is “baffle_credential_store” and cannot be changed.
Select LOCAL for Keystore type. For Secret Key, enter any random string which will be used to generate a random key to encrypt the Keystore Config Password. For Config Password, enter a secure password or passphrase to secure the actual keystore.

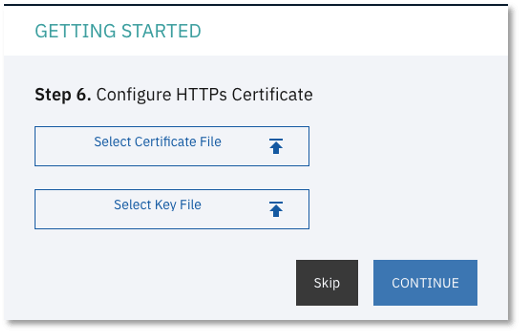
10. Install SSL Certificate. This configuration step allows you to install an SSL certificate to secure access to the Baffle Manager web interface. Upload the certificate and key file for your organization or respective CA to enable SSL for the Baffle Manager console.
-
- This should complete the initial setup process and bring you to the login page.
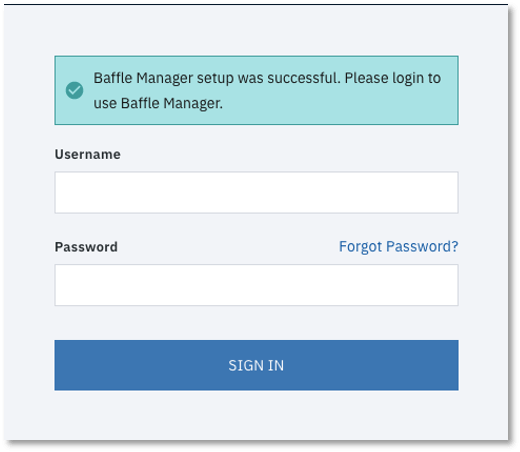
12. Enter the credentials for the administrator account you created in Step 9 to login and continue the configuration process.
Task 2. Connect to a Keystore
Before you can enroll your applications, add databases and enable encryption, you must enroll your Keystore so that Baffle Manager can access and/or create data encryption keys (DEKs) that will be used to protect your data.
Baffle Data Protection Services supports various Keystore vendors using industry standard protocols such as KMIP, PKCS#11, and REST APIs. Follow the steps below to enroll a Keystore for use with Baffle Shields and databases.
To connect to the keystore, do the following:
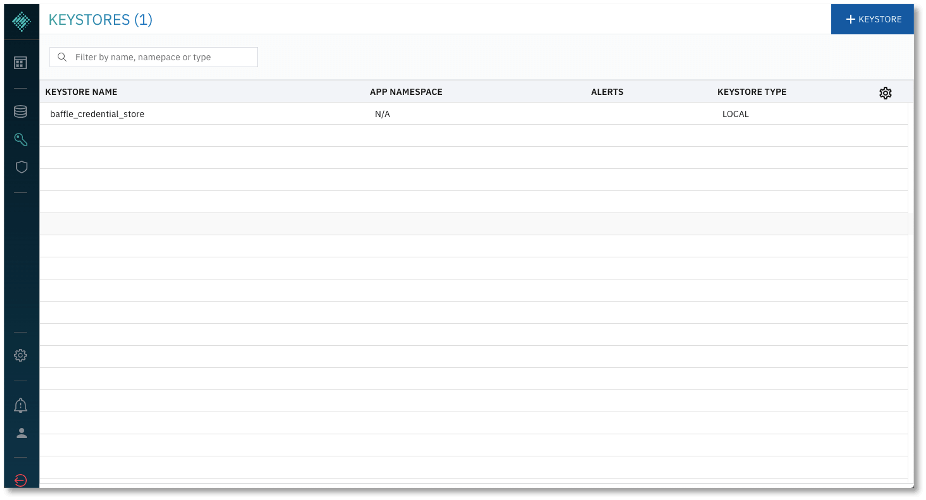
- Display a list of configured keystores. After logging into Baffle Manager, click the key icon on the left navigation panel. If this is the first time you are enrolling a Keystore, there will only exist the “baffle_credential_store” that was created in the previous section.
Click +KEYSTORE in the top right corner to add a new Keystore.
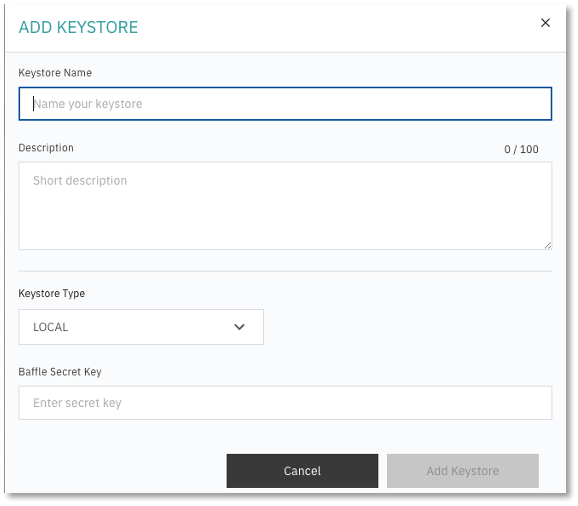
2. Enter a Keystore name and description.
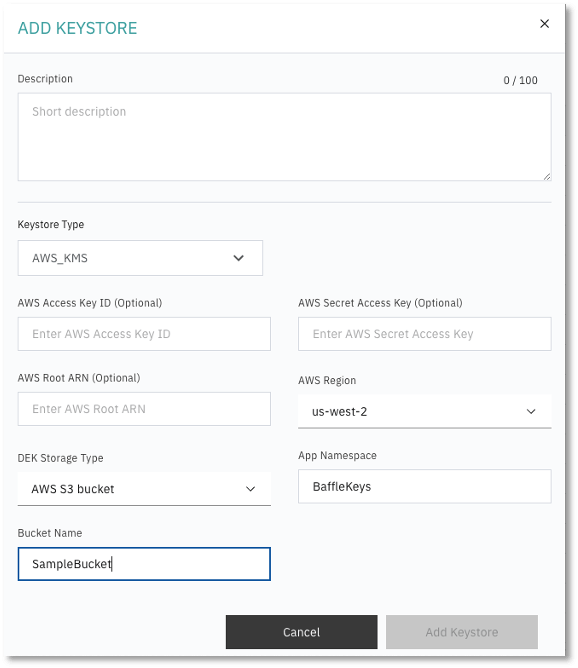
3. Specify the Keystore Type from the dropdown menu and enter respective parameters for
the Keystore selected.
Keystore parameters are specific to the Keystore type or vendor.
4. When completed, click on “Add Keystore”.
Example of a Local Keystore configuration:
Example of an AWS KMS configuration:
Task 3. Connect to a Data Store
In this section, you will configure a connection to a database. This connection will allow Baffle Manager to enumerate fields or columns that can be selected as part of a data privacy policy, in order to enable column level encryption.
To connect to a data store, do the following:
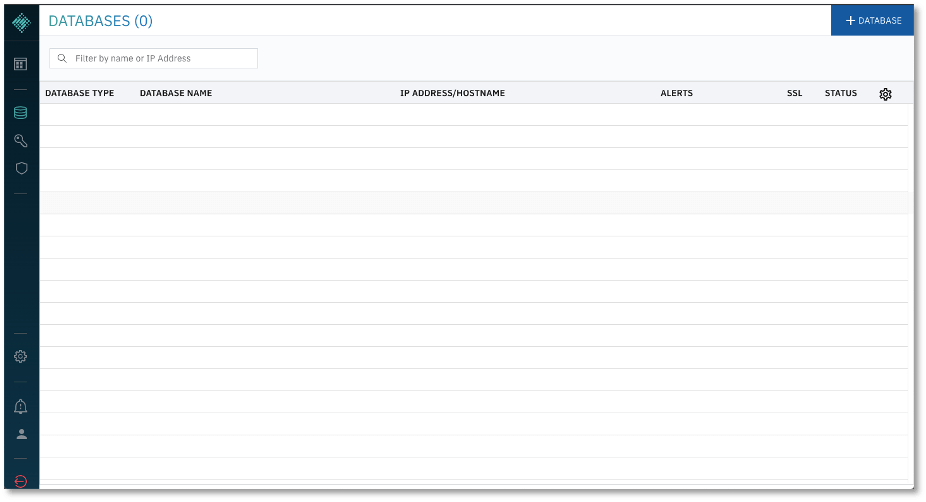
1. Display the list of configured databases. Click on the database icon on the left navigation panel to display a list of configured databases.
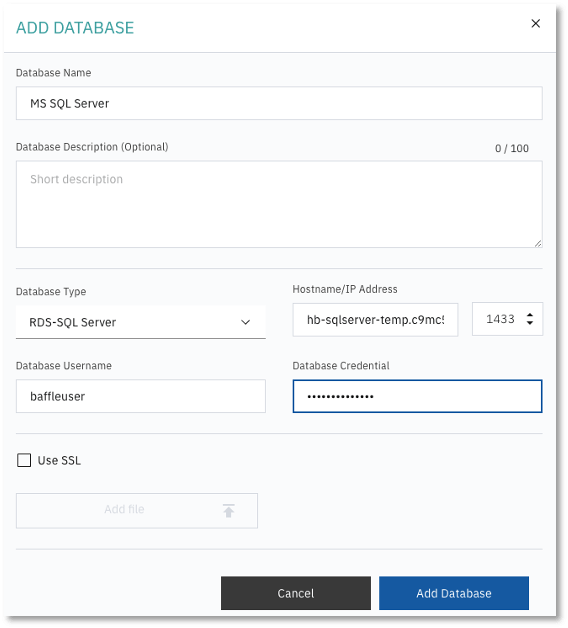
2. Enroll a database. Click +DATABASE to add a Data Store. Enter a database name and description.
- Specify the database type, and enter the hostname or IP (endpoint) for the database. For AWS RDS enter the endpoint URL.
- Enter the port for the database. Default database ports are listed in the Port Requirements table.
- Enter the database user credentials. It is recommended that you create a new user on your database for use with Baffle. See Appendix A for details.
NOTE: For information on how to allow users on your database with less privileges to access the encrypted data, see Appendix B. - Select Use SSL to enable an SSL/TLS connection to the database.
The following example is of a Microsoft SQL Server configuration.
For Postgres Configurations:
You must enter the name of the database that you intend to connect in the field ‘Postgres Database Name'. Otherwise, Baffle Manager will connect to a database with the same name as your database username. If no such database exists, then the connection attempt will fail.
The default database name is “postgres”.
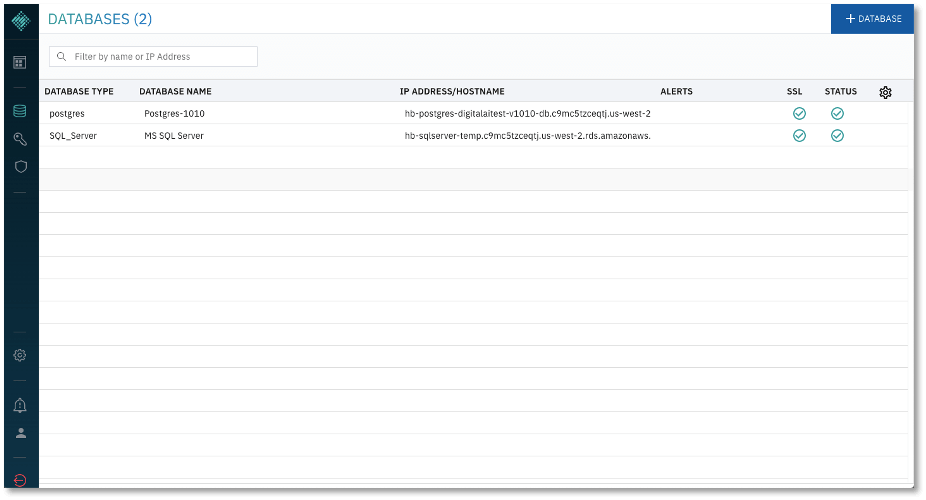
3. Click Add Database to complete enrollment. The new database should be listed along with the other configured databases as shown below.
Task 4. Launch and Configure a Baffle Shield AMI
This section walks through the installation and configuration of a Baffle Shield. The Shield will be used to enforce a Data Protection Policy, encrypting the data in the databases that were configured in the previous section.
To launch Baffle Shield, do the following:
1. Configure an AMI instance to run the Baffle Shield.
a. In AWS, go to EC2 and launch a new AMI instance with a CentOS 7 operating system and appropriately sized for your environment.
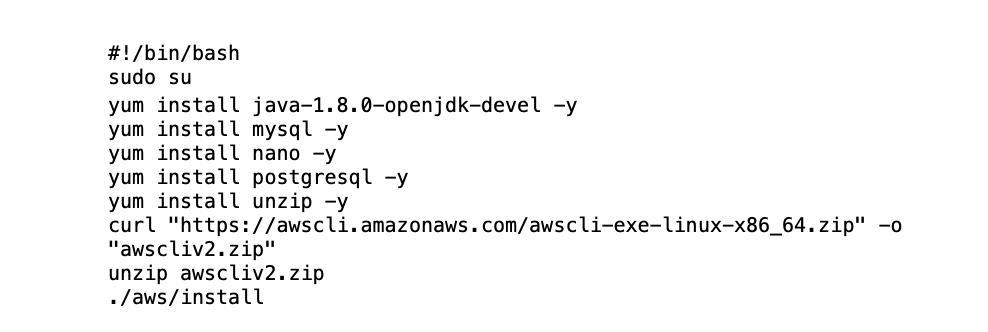
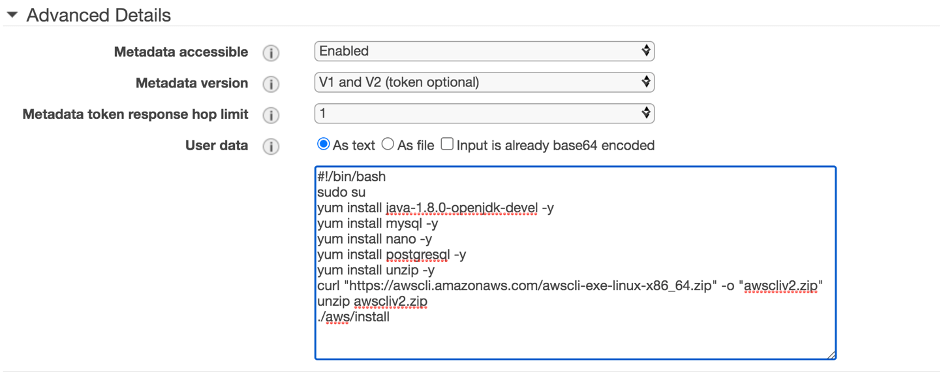
b. Issue the following bootstrap commands in the Advanced Details section during the instance setup process.
c. Select the same security groups you used for the Baffle Manager configuration. Ensure the security group for your Baffle Shield allows inbound connections from Baffle Manager (on port 22) and from your own IP address (on port 8444 by default).
d. Once you complete the setup process, allow the instance a few minutes to initialize.
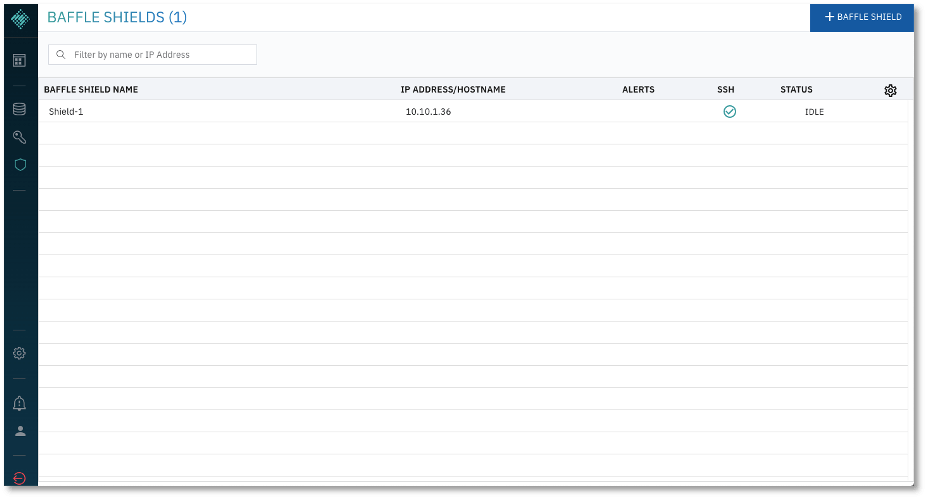
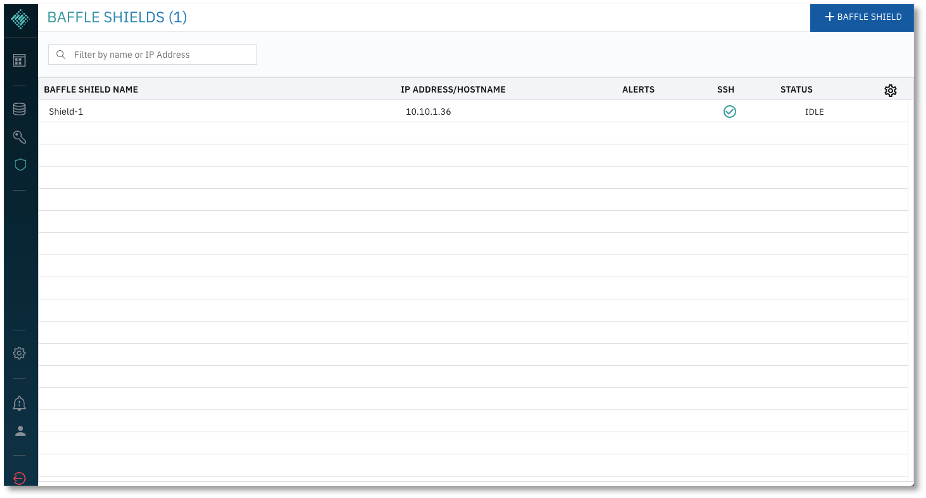
2. Connect the Baffle Shield to Baffle Manager. Once the instance is running, return to your Baffle Manager admin interface. Click on the shield icon on the left navigation panel. A list of connected Baffle Shields appears. Click +BAFFLE SHIELD in the upper right corner.
To configure Baffle Shield, do the following:
1. Enter a name and description in the appropriate fields.
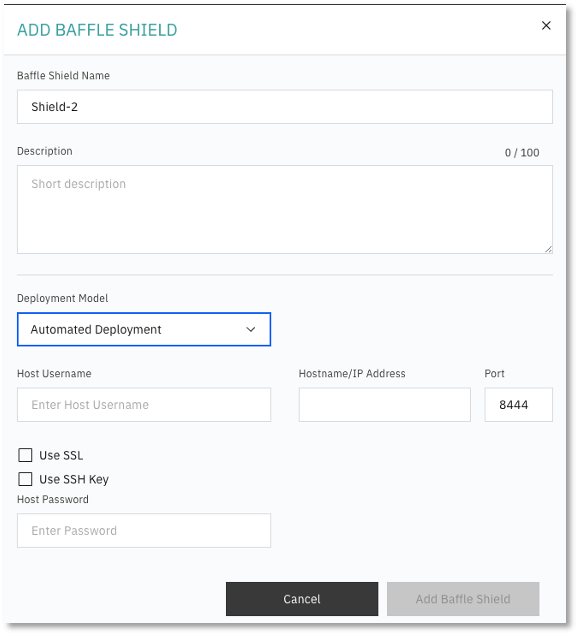
- Do the following:
- Select “Automated Deployment” for Deployment Model.
- Enter the Host Username “centos” to access the Baffle Shield EC2 Instance.
- Enter the IP Address of the Baffle Shield you just launched. NOTE: If your Shield runs in the same VPC as your Baffle Manager instance, it is recommended that you use the Private IP address here.
- Enter a port number that the Baffle Shield will use to listen for application connections. The default port is 8444.
- Select “Use SSL” if the data store connection uses SSL.
- Select “Use SSH Key” and upload the key that you selected when you set up the Shield instance.
- Optionally, a username and password can be used to access the Baffle Shield.
- Click Add Baffle Shield to complete the process. The new Shield is added to the list of configured Baffle Shields.
NOTE: If the Baffle Manager is unable to connect to the shield, verify that your Shield’s security group permits inbound access from Baffle Manager.
Task 5. Define a Data Protection Policy and Encrypt your Data
You have established all the components of Baffle’s Advanced Data Protection. This section brings the components together, creating an application to execute a Data Protection Policy. The policy selects columns for encryption and keys that will be used for the encryption process. Upon completion of the Data Protection Policy, you can migrate data through a Baffle Shield and encrypt the existing data in your data store.
The creation of a Data Protection Policy establishes a Privacy Schema that Baffle Shields use to present the original data schema to a respective application while handling the encrypt and decrypt operations transparently for the configured fields.
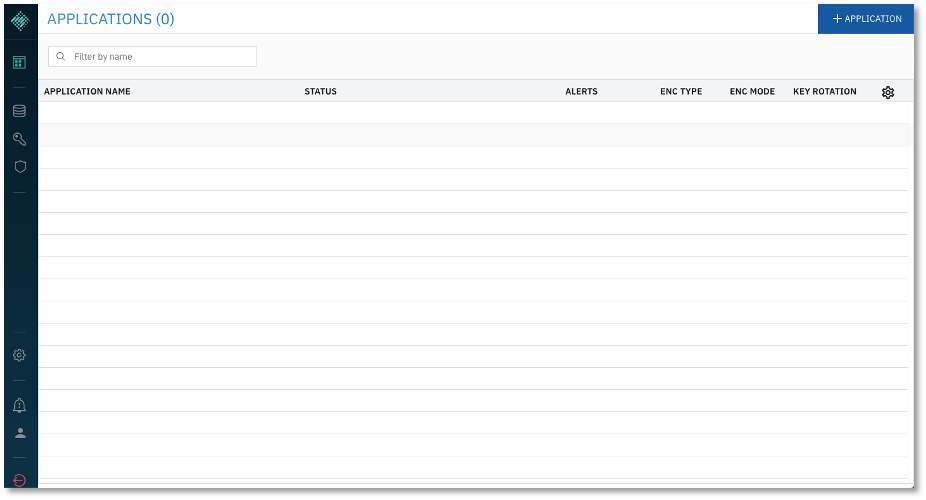
1. Add an Application to create a Data Protection Policy. Click the Applications Icon in the left navigation panel. Previously defined Data Protection Policies are displayed as Applications. Click +APPLICATION to create a new policy.
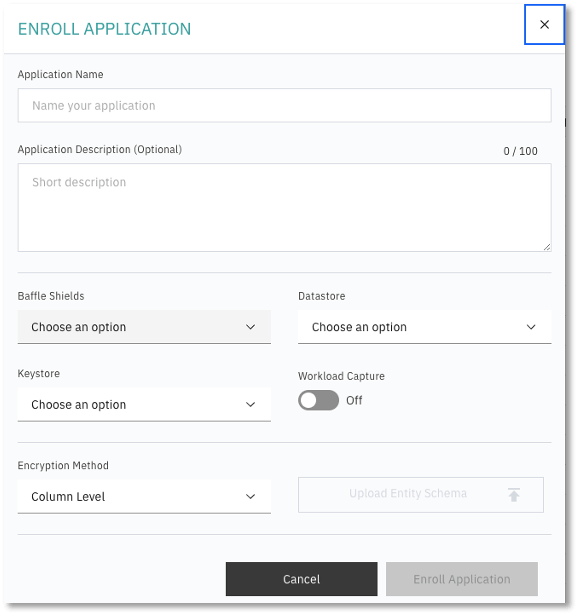
The Enroll Application dialog appears.
2. To Enroll Application, enter a name and description and do the following:
- Choose the Baffle Shield from the drop down that was configured in the previous section.
- Select the Data Store which you will encrypt.
- Select the Keystore to be used as a source for data encryption keys.
- Specify the operational mode for the Baffle Shied. Leave Workload Capture Off, unless profiling an application.
- Specify Column Level for the Encryption Method.
- Click Enroll Application.
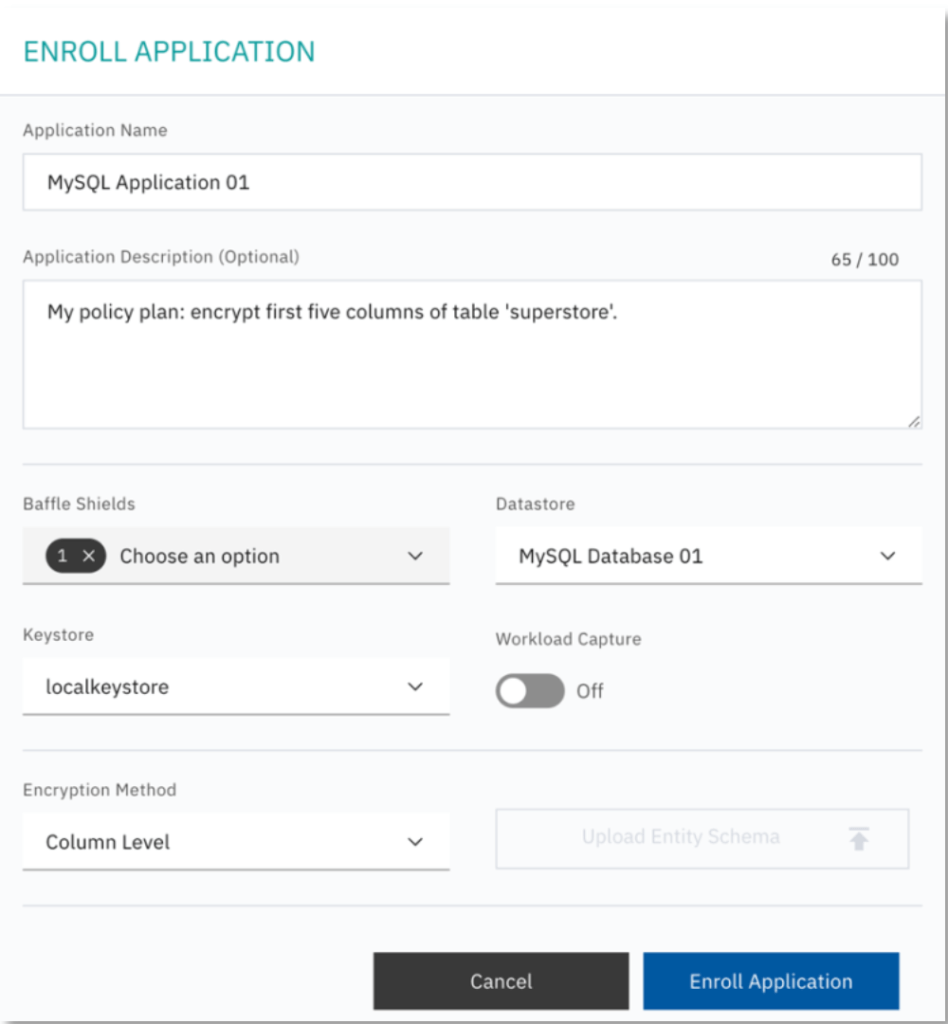
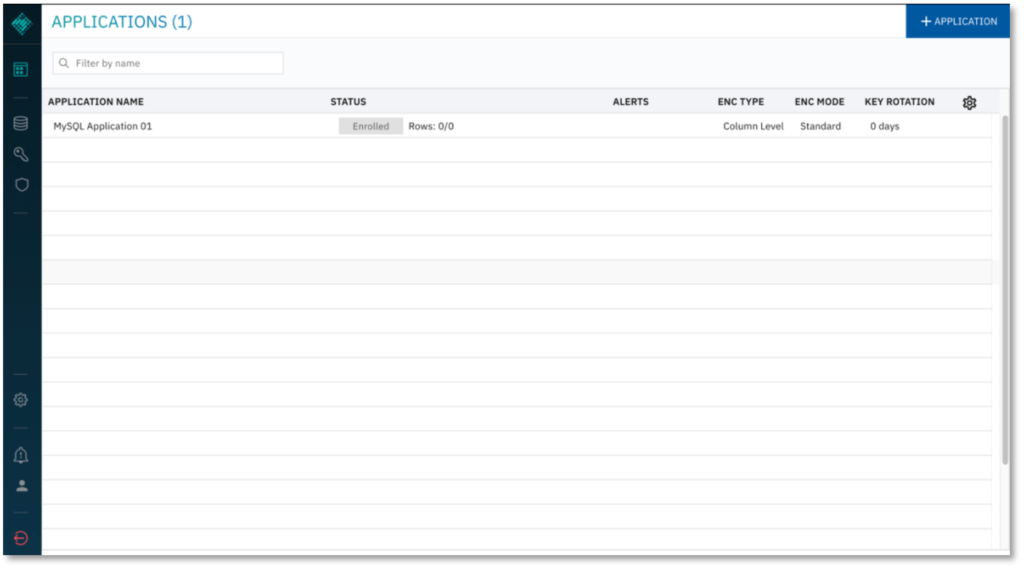
The following is an example of enrolling an application and deploying a Data Protection Policy for a MySQL database.
The Applications page displays the new application.
3. Define the Data Protection Policy. Select the Application you just configured, then click ENCRYPT in the side bar that appears showing information about the application.
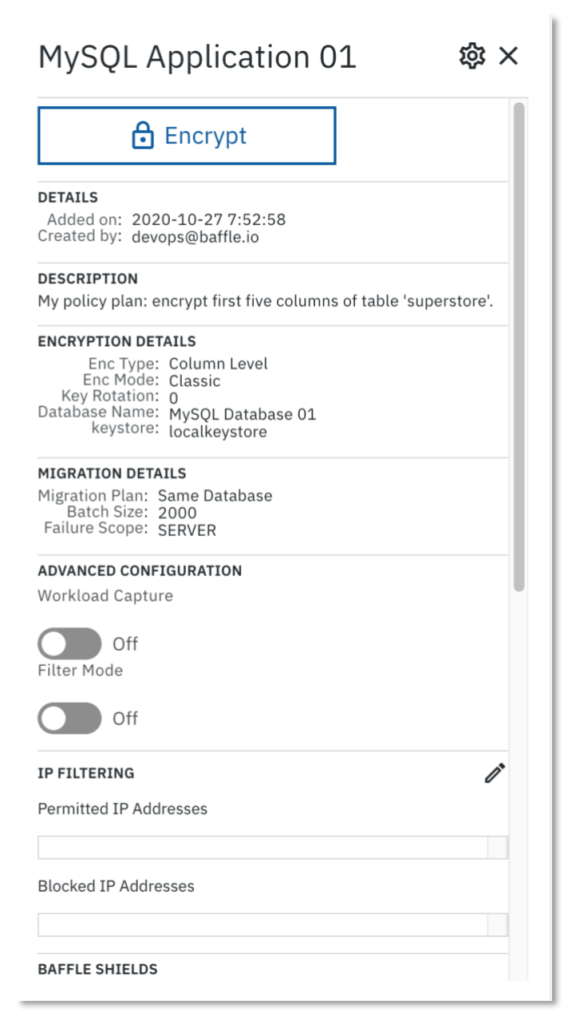
The Policy Builder window appears for the configured data store
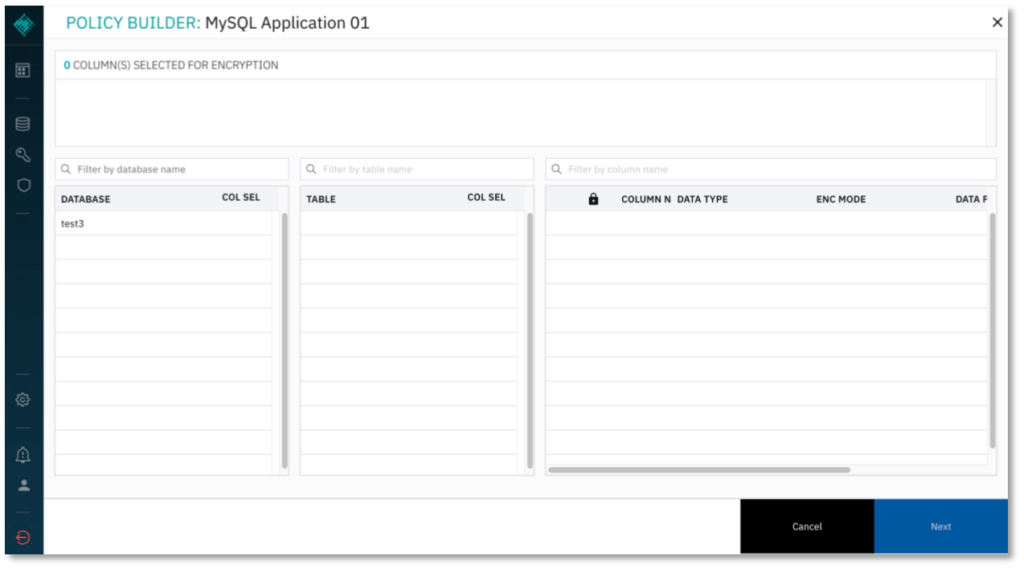
4. Select the database and table to encrypt.
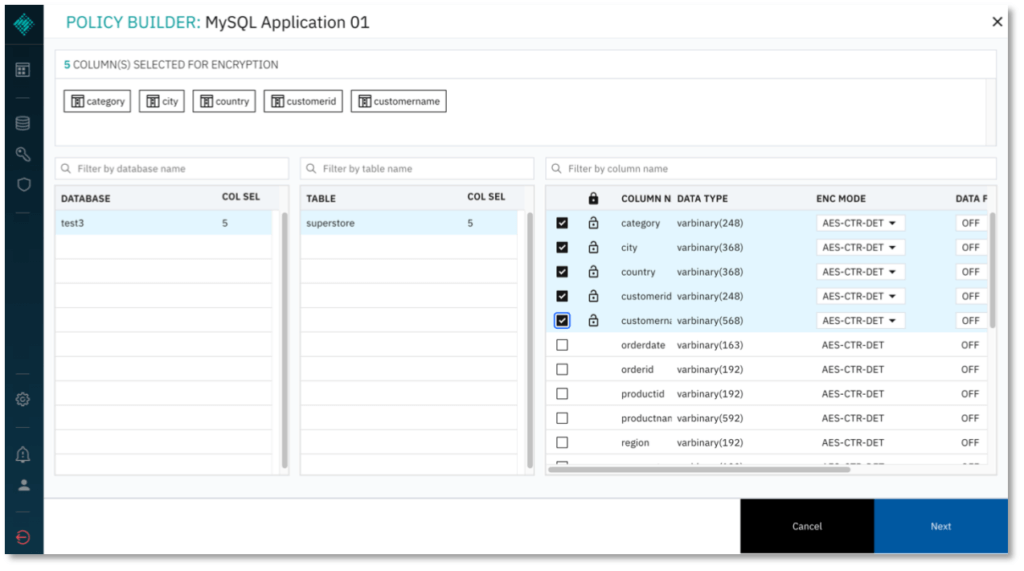
- Select columns for encryption and the respective encryption mode.
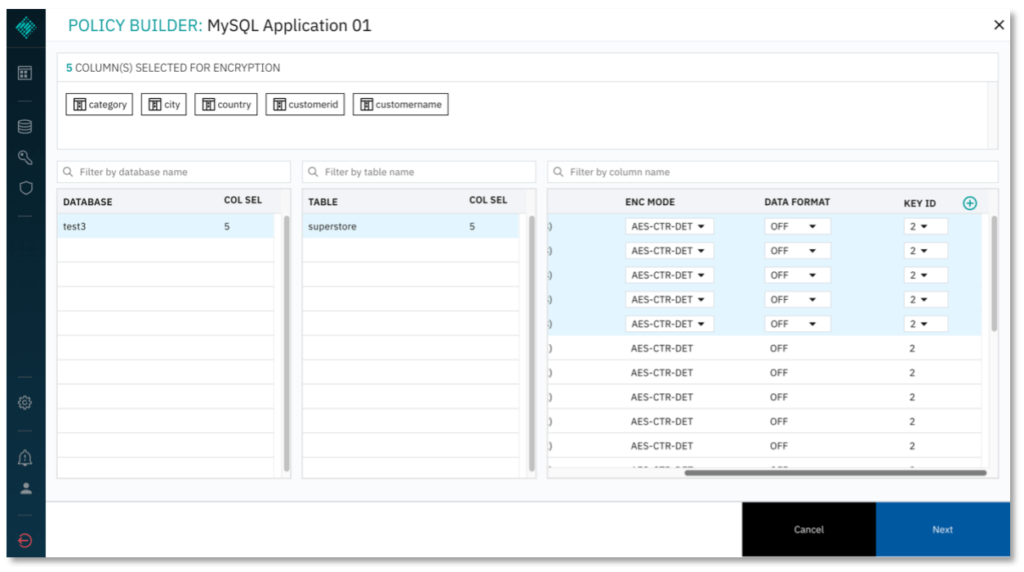
- Optional: Specify Key IDs for use to encrypt specific columns. Scroll to the right on the column selector and add more keys by clicking (+). The default value for Key ID is 2. Available Key IDs will be displayed in the Key ID dropdown menu for each column.
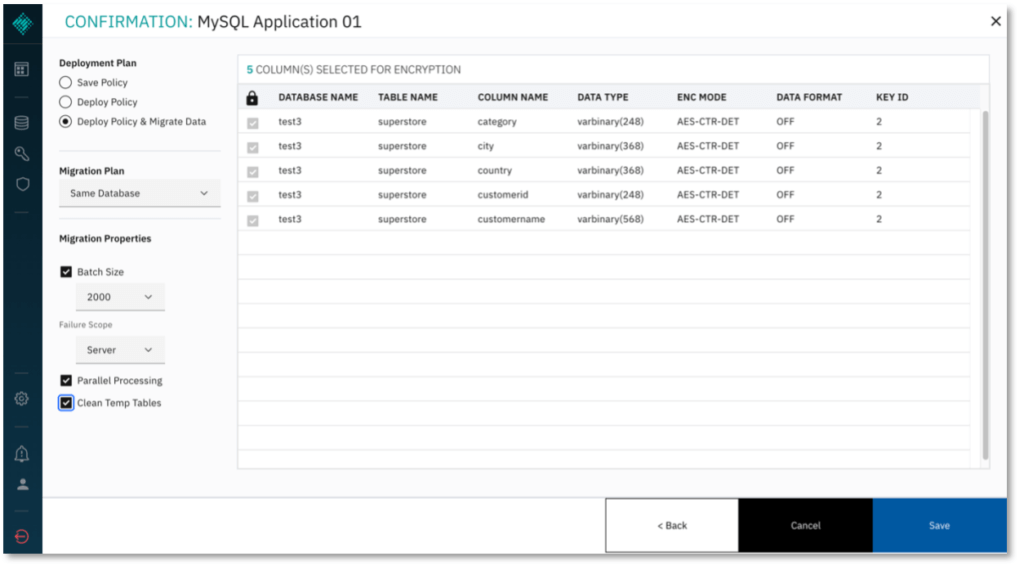
7. Click NEXT to proceed. Under Deployment Plan, select Deploy Policy & Migrate Data to save and deploy the policy you have just configured, and to migrate the existing data in the columns you selected. Alternatively, you may simply save the policy to edit it later, or deploy the policy without migrating existing data.
- Select the option to Clean Temp Tables so the Baffle Shield deletes the temporary tables it will use to carry out encryption.
- Click SAVE to complete policy creation and execute the policy.
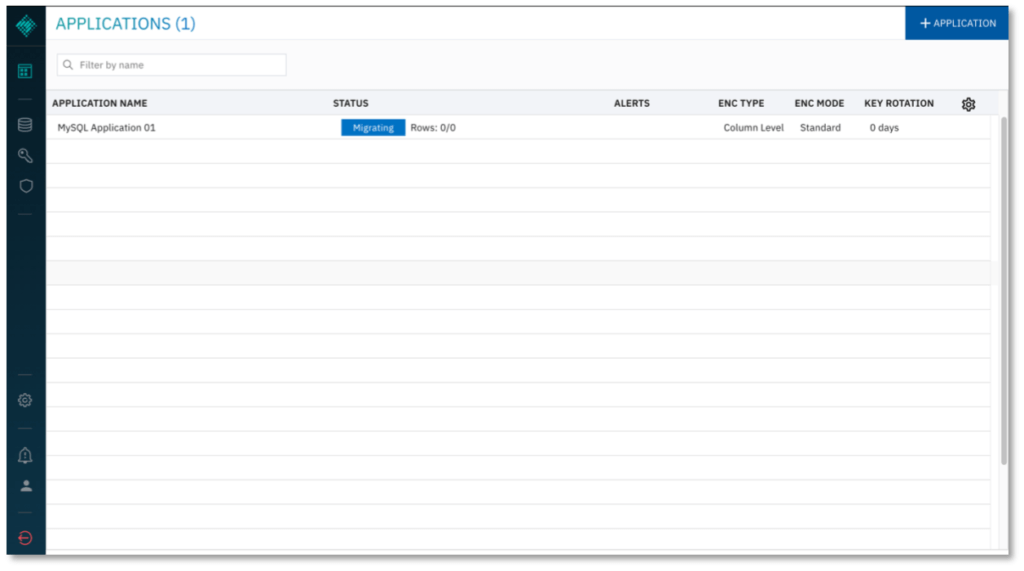
8. The Applications list now indicates the data migration is in progress. If migration does not initiate, you may have to configure your database user privileges. For more information, see Appendix A.
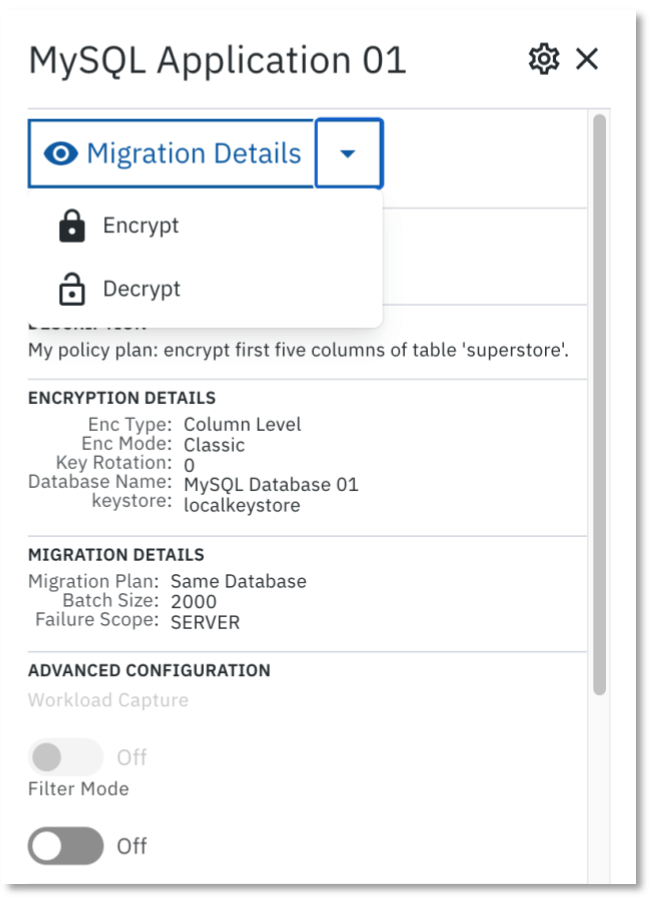
9. To Decrypt data, click on the application again, and select DECRYPT from the dropdown menu. The Policy Builder will re-open. Select the columns which you would like to decrypt and click NEXT to proceed. Only the columns that you have previously encrypted will be available to decrypt.
Summary
You have now completed configuration of the Baffle Manager, Baffle Shield and created a Data Protection Policy to protect your data.
To confirm your data is encrypted, access the database normally with your SQL client. You should find the columns you selected are now encrypted.
To view the columns in the clear, use your SQL client to connect to the Baffle Shield. Connect using the public IP address of the Shield, port 8444, and the credentials for the database user you submitted in section 3, step 2b. Access the encrypted tables, and you should find the columns are visible.
Appendix
Task A: Database Privileges for encryption and migration
In order to carry out encryption and migration, Baffle Shield requires certain user permissions on the database. It is recommended that you create a new user on your database for Baffle Shield to use, rather than assign your database administrator.
Use your SQL client to issue the following grants. Enter the credentials of this new user in section 3, step 2b, so that Baffle Shield has full privileges to encrypt and decrypt the data you select.
- To create a new user:
- To grant the requisite permissions:
Repeat step c for each database you wish to encrypt. When completed, Baffle Shield has the necessary permissions in order to carry out encryption and migration. Use the credentials of the user specified here.
Task B: Minimum Required Database Privileges
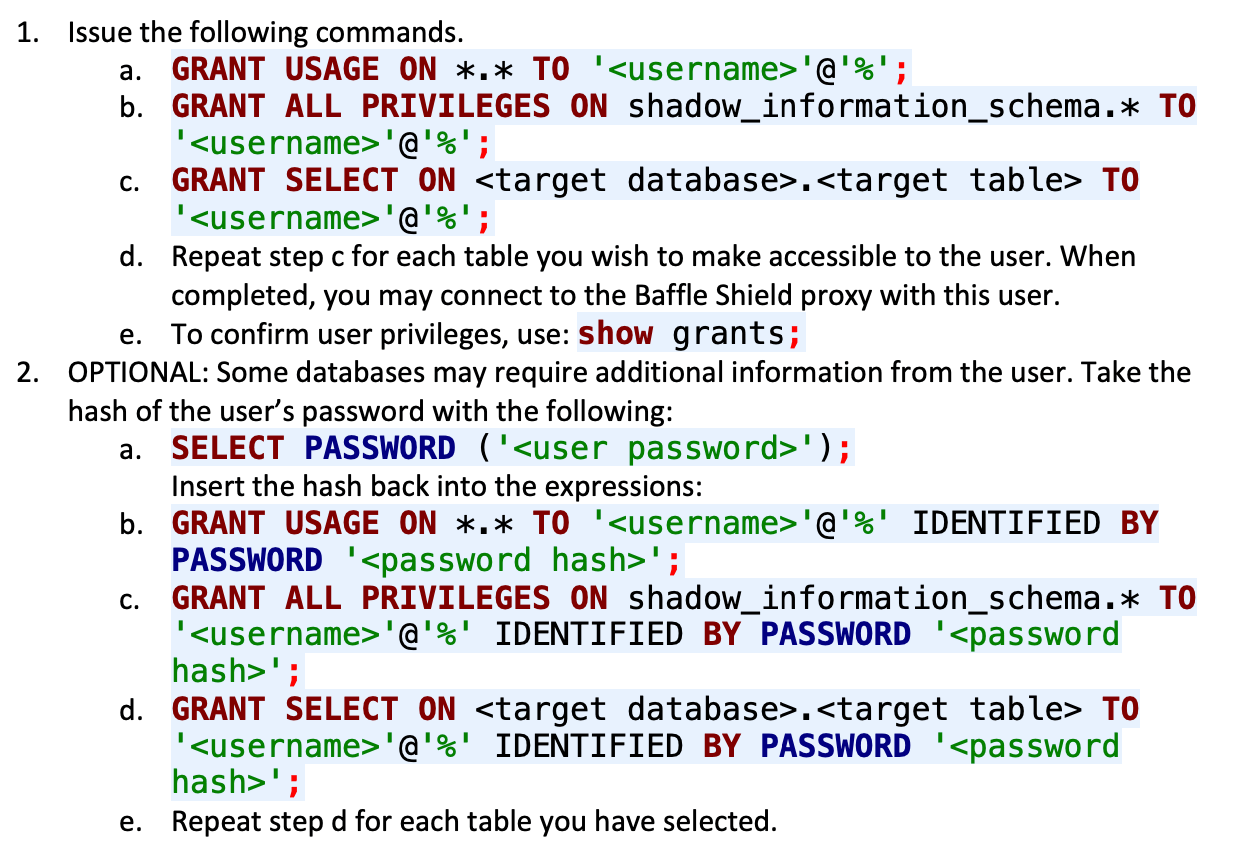
These are the minimum required grants for users on your database who need the least access privileges. Use your SQL client to issue the following commands with your admin user. These grants permit the restricted-access user to obtain only the data you specify.
For MySQL and Aurora databases:


